Introduction
In this guide we will cover how to generate keys for you GHOST Node and how to submit your $GMV balances to the GHOST Chain Genesis Block.
Before proceeding please make sure that you have followed the GHOST Chain Startup Guide and GHOST Chain Testing Connectivity Guide.
GHOST Chain Key Generation
Every node on GHOST Chain should have the following keys:
- Node Keys – a unique Node identifier that allows GHOST Chain nodes to interact with one another.
- Wallet Keys – a unique wallet identifier and some form of it is used as the destination address for transactions.
- Session Keys – a unique session identifier that are used by validators to sign consensus-related messages.
The following keys are needed for you node to enter and continuously function on GHOST Chain.
GHOST Chain Genesis Block Application
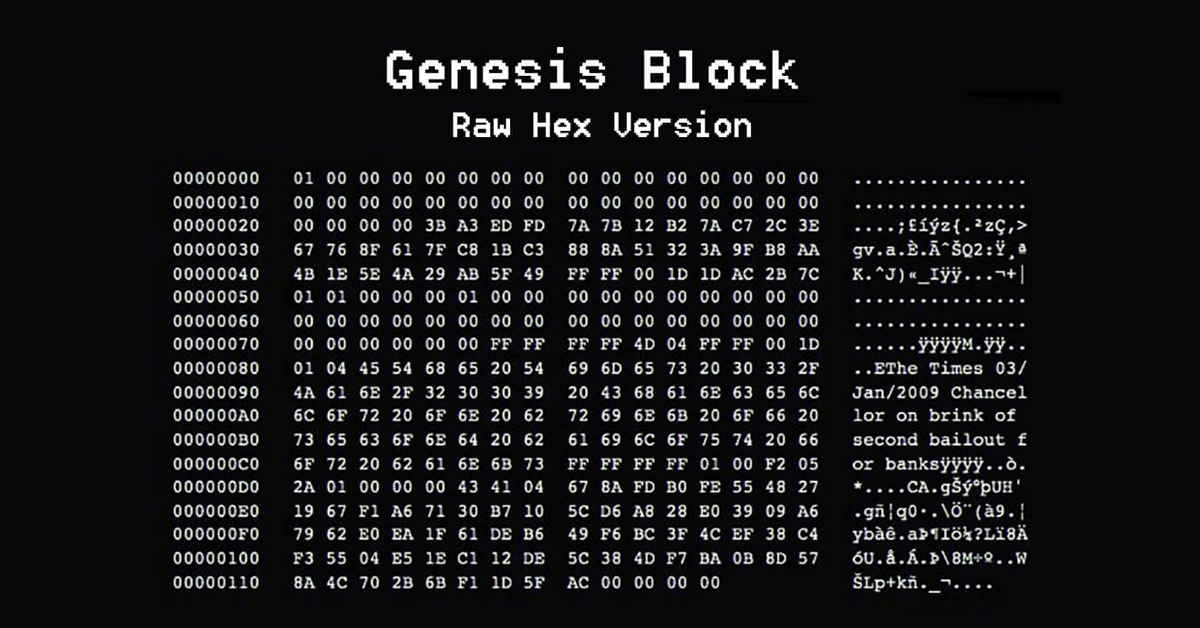
Every redeployment of GHOST Chain TestNet and consequently GHOST Chain MainNet will begin with the first block on the ledger called the Genesis Block. This Genesis Block can contain a lot of relevant and irrelevant information. The way GHOST project will use the Genesis Block is to record the initial balances of every user’s earned $GMV thus codifying the earned balances on-chain.
Let’s take the opportunity the remind our community that you can still earn $GMV through ghostAirdrop and ghostAirdrop Bot.
1. GHOST Chain Key Generation

Start with creating the following directory:
sudo mkdir /etc/ghostGet your username:
whoamiGive the user permission to the directory and substitute {USERNAME} for the one from previous command:
sudo chown {USERNAME} /etc/ghostGenerating Node Keys
To generate the node key use the following command:
~/ghost/ghost-node/target/release/ghost key generate-node-key --bin --file=/etc/ghost/node-key
Generating Wallet Keys
Generate Wallet Key file with the following command:
~/ghost/ghost-node/target/release/ghost key generate | grep "Secret seed" | awk '{$1=$2=""; sub(/^[ \t]+/, ""); print}' > /etc/ghost/wallet-keyDisplay the wallet-key on the screen by using cat command:
~/ghost/ghost-node/target/release/ghost key inspect $(cat /etc/ghost/wallet-key)
Feel free to back the file on a separate storage device.
Generating Stash Keys
Generate Stash Key file with the following command:
~/ghost/ghost-node/target/release/ghost key generate | grep "Secret seed" | awk '{$1=$2=""; sub(/^[ \t]+/, ""); print}' > /etc/ghost/stash-keyDisplay the stash-key on the screen by using cat command:
~/ghost/ghost-node/target/release/ghost key inspect $(cat /etc/ghost/stash-key)
Generating Sessions Keys
Generate Session Key file with the following command:
~/ghost/ghost-node/target/release/ghost key generate | grep "Secret seed" | awk '{$1=$2=""; sub(/^[ \t]+/, ""); print}' > /etc/ghost/session-keyYou have generates 4 types of Session Keys:
- Session Key – AUDI
- Session Key – BABE
- Session Key – SLOW
- Session Key – GRAN
Now. lets display them!
Generating Sessions Key – AUDI
Display the session-key//audi on the screen by using cat command:
~/ghost/ghost-node/target/release/ghost key inspect "$(cat /etc/ghost/session-key)//audi"
Generating Sessions Key – BABE
Display the session-key//babe on the screen by using cat command:
~/ghost/ghost-node/target/release/ghost key inspect "$(cat /etc/ghost/session-key)//babe"
Generating Sessions Key – SLOW
Display the session-key//slow on the screen by using cat command:
~/ghost/ghost-node/target/release/ghost key inspect "$(cat /etc/ghost/session-key)//slow"
Generating Sessions Key – GRAN
Display the session-key//gran on the screen by using cat command:
~/ghost/ghost-node/target/release/ghost key inspect "$(cat /etc/ghost/session-key)//gran" --scheme=ed25519
2. GHOST Chain Genesis Block Application
We are going to be transitioning a bulk of GHOST Chain related discussions and files to GHOST Git.
Set up GHOST Git
- Go to GHOST Git.
- Sign In using your TG handle as Username and your MetaMask wallet address (The one you used in the Startup Guide Application) as Password.
- Make sure to CHANGE the username and password given to you.
- Optional: Change your the email that we have provided for you.
- Change your Avatar picture to JML NFT.
Create GHOST Chain Genesis Block Pull Request
Go to GHOST directory:
cd ~/ghost/ghost-nodeUpdate local copy of GHOST repository:
git pull origin mainCreate a new branch replacing {BRANCH NAME} with a something you can identify in the future. You will be referring to this branch name in the future and you will be sharing your Public Keys there as well:
git checkout -b {BRANCH NAME}Now you will have to edit the actual file ghosties file that will used in the Genesis Block. Open the file in nano editor:
nano service/ghostiesYou can use Up/Down keys to navigate the ghosties file. Scroll all the way to the bottom submission and paste your submission of keys below:
### TEMPLATE ###
Local identity             : ./PATH_TO_GHOST/ghost key inspect-node-key --bin --file PATH_TO_NODE_KEY
Public key (hex) wallet    : ./PATH_TO_GHOST/ghost key inspect $(cat PATH_TO_WALLET_KEY)
==================================================================================================================
Public key (hex) stash     : ./PATH_TO_GHOST/ghost key inspect --scheme=sr25519 $(cat PATH_TO_STASH_KEY)
Public key (hex) audi      : ./PATH_TO_GHOST/ghost key inspect --scheme=sr25519 "$(cat PATH_TO_SESSION_KEY)//audi"
Public key (hex) babe      : ./PATH_TO_GHOST/ghost key inspect --scheme=sr25519 "$(cat PATH_TO_SESSION_KEY)//babe"
Public key (hex) slow      : ./PATH_TO_GHOST/ghost key inspect --scheme=sr25519 "$(cat PATH_TO_SESSION_KEY)//slow"
Public key (hex) gran      : ./PATH_TO_GHOST/ghost key inspect --scheme=ed25519 "$(cat PATH_TO_SESSION_KEY)//gran"
The submission should look something like this:
### My Submission for Genesis Code - Satoshi ###
Local identity             : 12D3KooWPvdyWvTrTpkBKoGZ8KBMjEumrSwWHThoTNg416mVakWJ
Public key (hex) wallet    : 0x80932904b805be74fa163be7474390633c96f319163f7466adf9844e9b4fa038
==================================================================================================================
Public key (hex) stash     : 0x7291cffd9a948e4a8f7ea9015faae5c9f2384821c34e831d5afaec3284a7c563
Public key (hex) audi      : 0x9a4a2cfc28b9196eea423b6177252f7598e93c5e40396a91d214e0bc6c4aca73
Public key (hex) babe      : 0xfa517486ef74d8cedbabc8fe4470b3e79c9afd44fca7e5c639e1612c026d2c3d
Public key (hex) slow      : 0x58a9b312e847a5bdd1d92d603c07fc3fb5af8d241c482c41e5a30db6240a4779
Public key (hex) gran      : 0xffd30acb4b7b4563585618fa0e35f0d64a512387fabe6db931e726e44d0e6726
Press Ctrl + X to save you submission followed by Enter to exit nano editor.
See the status of the file with the following command:
git statusIt should say modified: service/ghosties

Generate GIT SSH Key
Generate SSH Key, follow the prompt of giving the ssh file a name:
ssh-keygenAdd “Git Password”.
Give you SSH file a name replacing {SSH-FILENAME}:
~/.ssh/id_{SSH-FILENAME}Configure Git to use SSH:
git config --global gpg.format sshRun the SSH key, substitute {SSH-FILENAME}:
git config --global user.signingkey ~/.ssh/id_{SSH-FILENAME}.pubPrint your SSH Public Key:
cat ~/.ssh/id_{SSH-FILENAME}.pubGo to GHOST Git SSH Section.
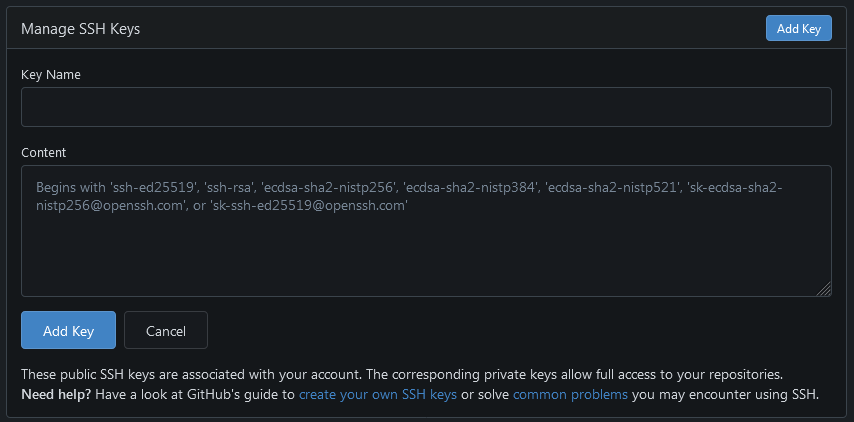
Click Add Key.
Submit the public signature to the SSH section by copying the Public Key from the terminal and pasting it into Git:
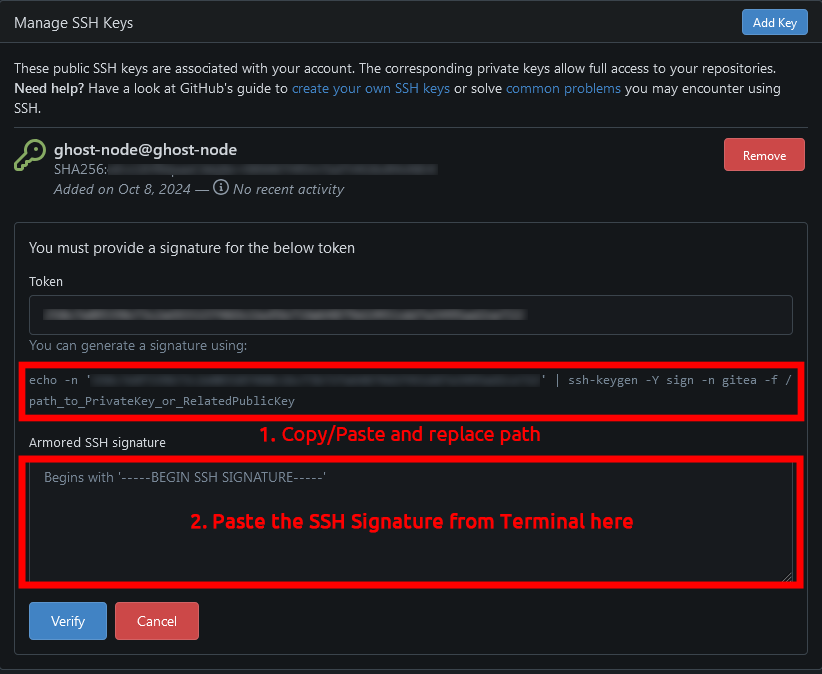
Make sure to verify the SSH by clicking Verify:

The Git will ask you to paste echo command into terminal. Replacing /path_to_PrivateKey_or_RelatedPublicKey with ~/.ssh/id_{SSH-FILENAME}. After running the command you will a SSH signature in the terminal. Copy/paste it back into the Git UI:
After clicking Save. It should look something like this:

Create a Git Branch
Push the commit through. Use the {BRANCH-NAME} you have created before for your commit. It will ask you to enter the passphrase which is the password form you GHOST Git account.:
git add service/ghostiesgit commit -S -m "{BRANCH-NAME}" -sAfter the message 1 file changed, 10 insertions(+) check the Git status again:
git statusPush the changes upstream:
git push --set-upstream origin {BRANCH-NAME}Check the Git status again:
git statusChange back to the main Git branch:
git switch mainConfirm GHOST Git Changes
- Make sure you are logged in into GHOST Git.
- Go to Ghosties Genesis File.
- Click on the green thing to submit changed.
- Make sure the Branch Name in Git matched to
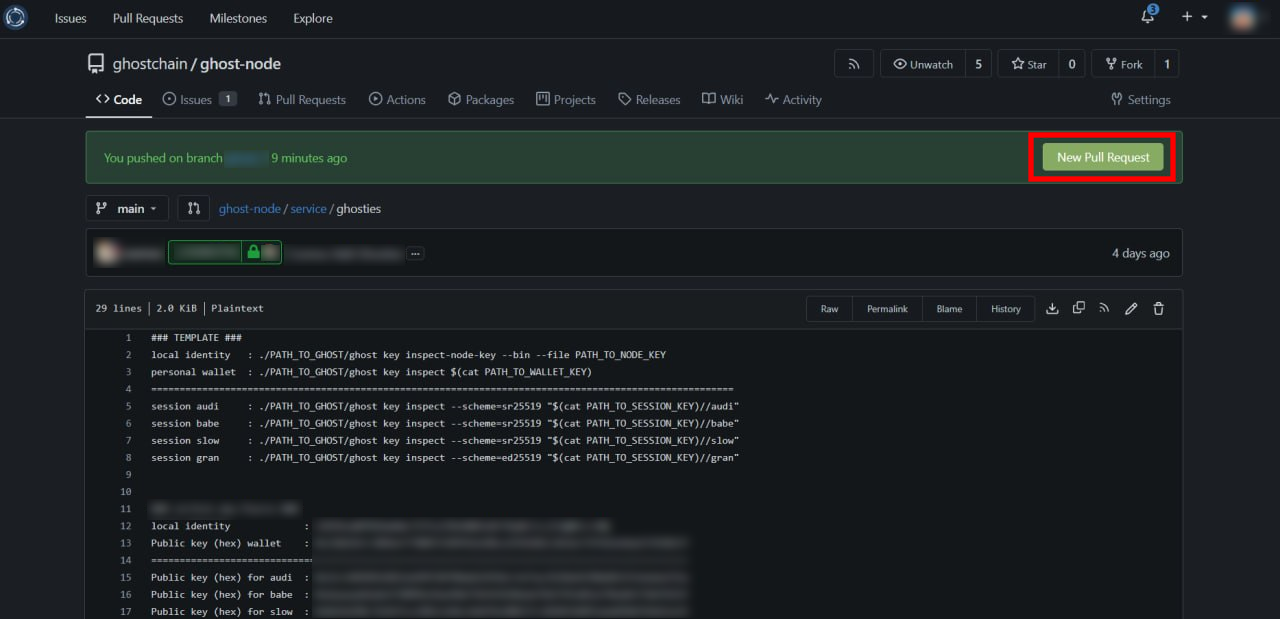
{BRANCH NAME}. - Make sure the keys in your entry of
ghostiesfile is correct. - Click New Pull Request.
- Make a final confirmation for your Branch by clicking Create Pull Request
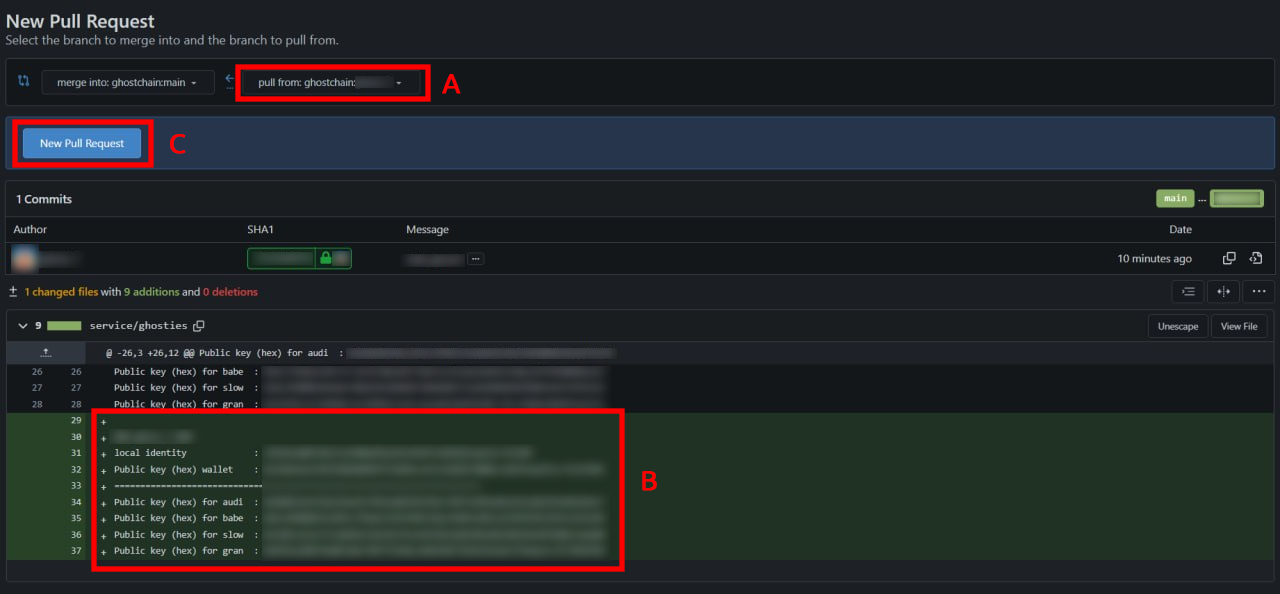
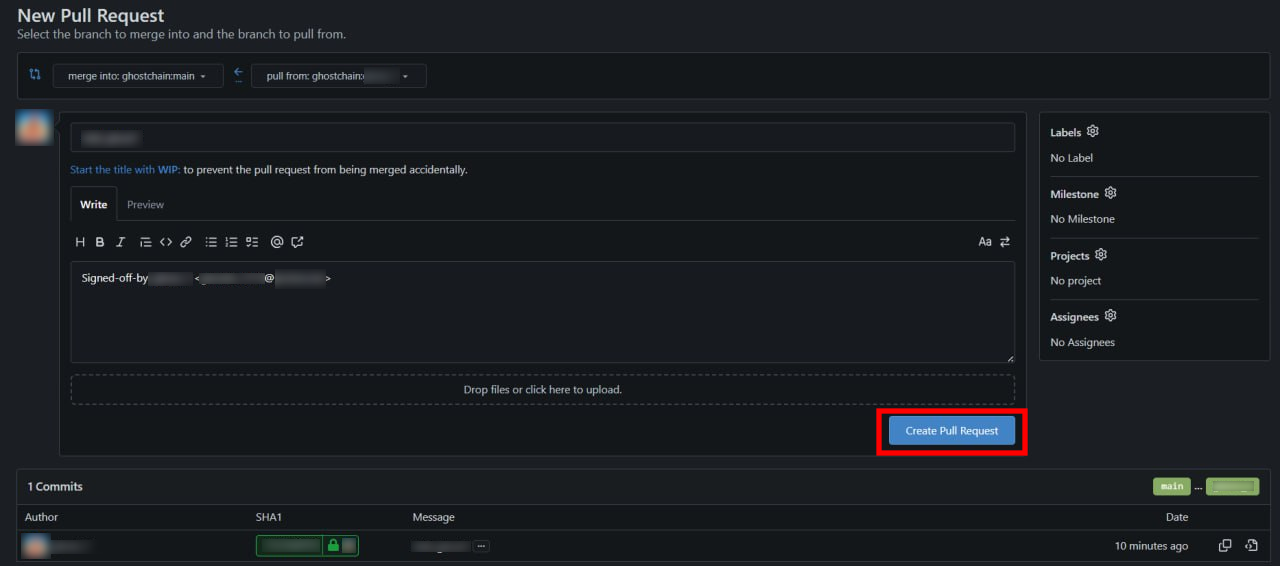
Congratulations! You have successfully applied for the GHOST Chain Genesis Block.
![You are currently viewing Generating Keys & Applying For Genesis Block [~2 HRS]](https://blog.ghostchain.io/wp-content/uploads/2024/10/Generating-Keys-Applying-For-Genesis-Block.png)
![Read more about the article Launching CASPER TestNet 6.0 [~1 HR]](https://blog.ghostchain.io/wp-content/uploads/2026/02/Launching-CASPER-TestNet-6.0-300x157.png)
![Read more about the article GHOST Chain TestNet 1.0 Cleaning Guide [~1 HR]](https://blog.ghostchain.io/wp-content/uploads/2024/10/GHOST-Chain-TestNet-1.0-Cleaning-Guide-300x157.png)
