Introduction
Welcome to the GHOST TestNet 2.0 Launch guide. In TestNet 1.0 only 2 nodes ran at any one point in time. One node was Alice and another was Bob. The main goal with TestNet 2.0 is to create blockchain that has as many nodes as possible running 24/7 from as many geographical locations as possible. TestNet 2.0 nodes that have participated in the genesis block will receive some $CSPR coin for future testing that may or may not include send/receive and staking functionality.
1. Prerequisites

Before you can proceed with launching you GHOST Node please make sure to go though the following guide:
- GHOST Chain Startup Guide – create the proper environment and install GHOST Chain.
- Generating Keys & Applying for Genesis Block – generate GHOST Node keys and apply for TestNet genesis block. **OPTIONAL** Only do this if you have been preapproved by GHOST validators.
- Testing Connectivity Guide – test whether or not you node can become a Boot Node and set proper firewall rules.
2. Launching GHOST TestNet 2.0

Stop ghost-node:
sudo systemctl stop ghost-nodeGo to ghost-node directory:
cd ghost/ghost-nodeRemove ghost ledger:
sudo rm -rf /var/lib/ghostSwitch to main GIT branch:
git switch mainMake sure ghost-node is up to date:
git pull origin mainRecompile ghost-node using starter.sh and --release flag. Make ghost-node service being able to be started by default user using --make-global:
./scripts/starter.sh --release --make-globalThe default option is capitalized which is N, you can also press Enter to choose the default option. In this case we want to recompile so type y and press Enter to proceed:
'cargo build --release ' is what you want? [y/N]:Recompiling will take some time!
Check the hash of the build:
sha256sum /etc/ghost/casper.jsonYou should see:
6c1bab2e9...b49fbc5008Create running ghost-node service that starts on system boot using --unit-file flag. And we must set up the ghost-node launch command by setting arguments using --set-arguments flag:
./scripts/starter.sh --unit-file --set-argumentsOnly change the defaults if you are advanced otherwise press Enter for the following prompts.
If this is your first node simply press Enter to proceed with the default. If this is your second node you should type a different port here, for example 30334, and then you should open this port on your firewall and create a dedicated port forwarding rule on your router as specified in the Testing Connectivity Guide:
specify p2p protocol TCP port (default: 30333):To choose default options press Enter here:
specify JSON-RPC server TCP port: (default: 9945):
specify the chain specification (default: /etc/ghost/casper.json):
specify node's secret key file for p2p networking (default: /etc/ghost/node-key):
It is recommended that you give your node a Name you can recognize:
specify name for the node (default: RANDOM_NAME):Validator Node vs Full Node
Currently you have to qualify to become a validator node through GHOST Whales. If you were NOT included in the ghosties file then you cannot be a validator node and you can only be a full node so for disable validator mode? [y/N] type y. If you were included in the ghosties file the you can press Enter:
disable validator mode? [y/N]: yYou can press Enter here:
enable prometheus? [y/N]:Boot Node
For the following prompt:
list of bootnodes if any:Paste one of the following Boot Node address:
| Boot Node Address | Port Status |
|---|---|
|
Checking port 30334 for https://bootnode69.chain.ghostchain.io...
|
|
Checking port 30333 for https://bootnode70.chain.ghostchain.io...
|
|
Checking port 30333 for https://ghostvision.mywire.org...
|
|
Checking port 30334 for https://ghostvision.mywire.org...
|
|
Checking port 30335 for https://ghostvision.mywire.org...
|
|
Checking port 30333 for http://84.247.181.131...
|
|
Checking port 30333 for http://47.199.13.160...
|
|
Checking port 30334 for http://85.190.242.68...
|
|
Checking port 30334 for http://47.199.13.160...
|
|
Checking port 30335 for http://47.199.13.160...
|
|
Checking port 30336 for http://47.199.13.160...
|
|
Checking port 30337 for http://47.199.13.160...
|
|
Checking port 30333 for http://Fujisan1.mywire.org...
|
|
Checking port 30334 for http://Fujisan1.mywire.org...
|
|
Checking port 30335 for http://Fujisan1.mywire.org...
|
|
Checking port 30336 for http://Fujisan1.mywire.org...
|
Changing unit-file name is optional, otherwise press Enter:
[?] name for the unit file (default: ghost-node.service)IF ERROR and [!] user ghost not found pops up press y:
[!] user ghost not found
[?] do you want to create ghost user? (NOT RECOMMENDED: current root) [y/N]:
[+] make ghost owner of /var/lib/ghost
[+] prepare unit file for the ghost-node.service
[+] reloading systemd because of updated unit file
DO NOT start and enable ghost-node.service press Enter:
[?] do you want to start the ghost-node.service? [y/N]:
[?] do you want to enable the ghost-node.service? [y/N]:
[+] execution finished
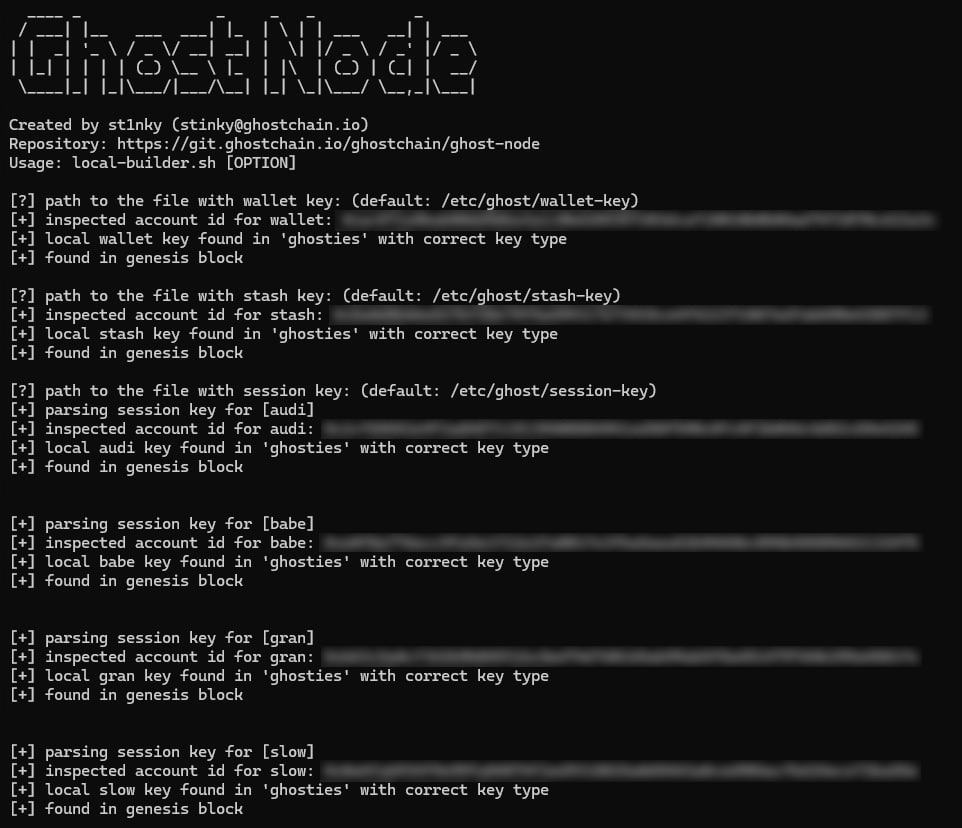
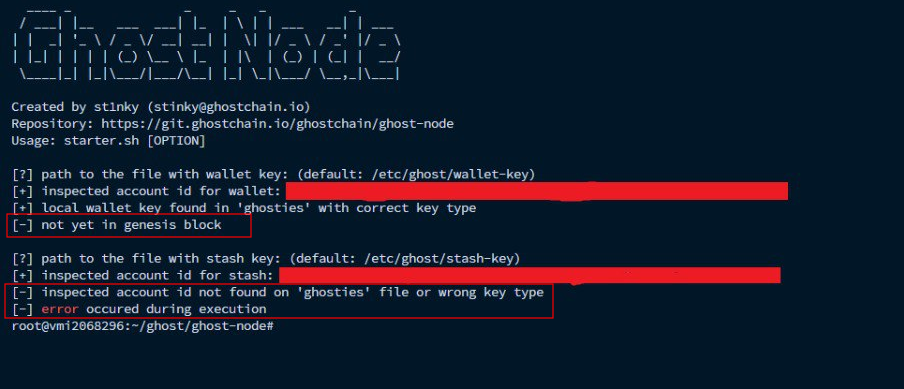
Now you can check whether or not the keys on your GHOST Node match those in the ghosties file on GHOST Git. If you are running a Validator Node and if you have followed the Generating Keys Guide you will see all [+]. If you are a running a Full Node you will see errors:
./scripts/starter.sh --check-keysIf you have followed Generating Keys Guide these should contain default paths so press Enter:
[?] path to the file with wallet key: (default: /etc/ghost/wallet-key)
[?] path to the file with stash key: (default: /etc/ghost/stash-key)
[?] path to the file with session key: (default: /etc/ghost/session-key)
Validator Nodes --check-keys results:

Full Nodes --check-keys results:

Start ghost-node:
sudo systemctl start ghost-nodeWait 60 seconds!
In order to insert keys run the following flags --check-keys --insert-keys:
./scripts/starter.sh --check-keys --insert-keysRestart ghost-node:
sudo systemctl restart ghost-nodeEnable ghost-node:
sudo systemctl enable ghost-nodeTo see the logs produced by your ghost-node:
journalctl -f -u ghost-nodeTo exit journalctl -f -u ghost-node Press CTRL + C.
Finally, go to GHOST Telemetry so see your node live on the map.
Congratulations! You have an operational GHOST Node.
3. Troubleshooting

For future troubleshooting be aware of the following commands:
Update GHOST Node
Go to GHOST directory:
cd ghost/ghost-nodePull the most recent GHOST Node Repo:
git pull origin mainSet arguments. In one of the prompts it is recommended that you give your node a Name you can recognize:
./scripts/starter.sh --set-arguments
## do all steps
Check GHOST Node log:
journalctl -f -u ghost-nodeTo exit journalctl -f -u ghost-node Press CTRL + C.
Delete GHOST Chain ledger
sudo systemctl stop ghost-nodesudo rm -rf /var/lib/ghost./scripts/starter.sh --unit-filesudo systemctl start ghost-nodeCheck session keys
./scripts/starter.sh --check-keys --insert-keyssudo ls -l /var/lib/ghost/chains/casper_staging_testnet/keystore/sudo systemctl restart ghost-node.serviceMiscellaneous
To soft reload the entire system:
sudo systemctl daemon-reloadTo stop ghost-node:
sudo systemctl stop ghost-nodeTo restart ghost-node:
sudo systemctl restart ghost-nodeTo see the logs produced by your ghost-node:
journalctl -f -u ghost-node![You are currently viewing Launching GHOST TestNet 2.0 [~1 HR]](https://blog.ghostchain.io/wp-content/uploads/2024/11/Launching-GHOST-TestNet-2.0-Featured-Image-v2.png)


![Read more about the article GHOST Chain TestNet 1.0 Cleaning Guide [~1 HR]](https://blog.ghostchain.io/wp-content/uploads/2024/10/GHOST-Chain-TestNet-1.0-Cleaning-Guide-300x157.png)