Introduction
Welcome to the GHOST Chain TestNet Startup Guide. Expect to spend roughly the next 4 hours setting up the GHOST Node. Here is the TLDR for the guide.
You will have to:
- Get a machine with Recommended Specs NOTE: Please use an older machine. It is NOT recommended to purchase a machine at this point in time.
- Install Debian 12 or Ubuntu 24.04 OS
- Enable SSH(Optional)
- Install Substrate Libraries & GHOST Node Application
- Submit the Application
Without further ado, lets begin!
Join GHOST Whales

Eventually GHOST TestNet will be available to anyone who is interested in joining the GHOST project. However, at initial stages GHOST TestNet is available only to GHOST Whales, an exclusive community for GHOST members. We urge you to become GHOST TestNet Node Operator sooner than later since incentives built into being a Node Operator will put you in a more favorable position in time for GHOST MainNet.
To apply for GHOST Whales CLICK HERE.
1. Get Correct Hardware

The Computer Hardware
Make sure your machine meets Recommended Specifications below. We do not suggest you go below these Recommended Specs:
- CPU – ARM or AMD Architecture, 2 Cores, 64-bit Instruction set
- RAM – 6GB
- Storage – 256GB SSD
- Internet Speed – 50 Mbps Down / 50 Mbps Up
- USB Drive – at least 16GB
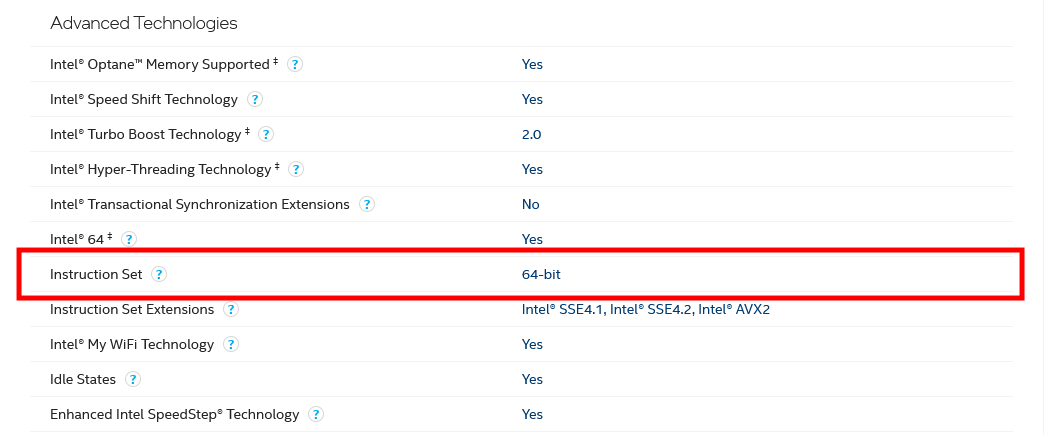
Simply google the name of your processor and find the manufacturer page. For example, lets say your processor is Intel i5 8250u. Upon further examination you can see that the chip supports both requirements: 2 Cores, and 64-Bit Instruction Set.
Intel example for Intel i5-8250u:
Computer Peripherals
It is worth mentioning that in case your node is a separate machine and not a laptop you might also have to consider acquiring:
- Monitor
- Mouse
- Keyboard
- HDMI Cable
- Ethernet Cable
Router Access
You will also need admin access to your home Network router if you are self hosting the node, meaning, you are not paying for a 3rd party service to host the node for you.
2. Install Debian or Ubuntu

Once you have acquired the correct hardware you will need correct software. We highly recommend to NOT install a virtual machine on your daily driver but to use a completely separate machine for GHOST Node. You must do a clean install of either Debian 12 or Ubuntu 24.04 LTS on your machine. Generally speaking you should install Debian if your machine is older with lower specs and/or you are bit more tech savy while you should install Ubuntu if you have a newer machine with higher specs and/or you are less tech savy.
Whatever you choose the steps will be very similar:
- Install Balena Etcher on your daily driver.
- Get the 16GB+ USB Drive
- Install either Debian OS or Ubuntu OS image file.
- Use Balena Etcher to flash the OS image onto the USB Drive
- Install OS on the GHOST Node Machine
Below you will find detailed video guides on how to install either Debian or Ubuntu on GHOST Node.
Install Debian
Here is the link to Debian Download page.
Install Ubuntu
Here is the link to Ubuntu Download page.
3. Install SSH (Optional)
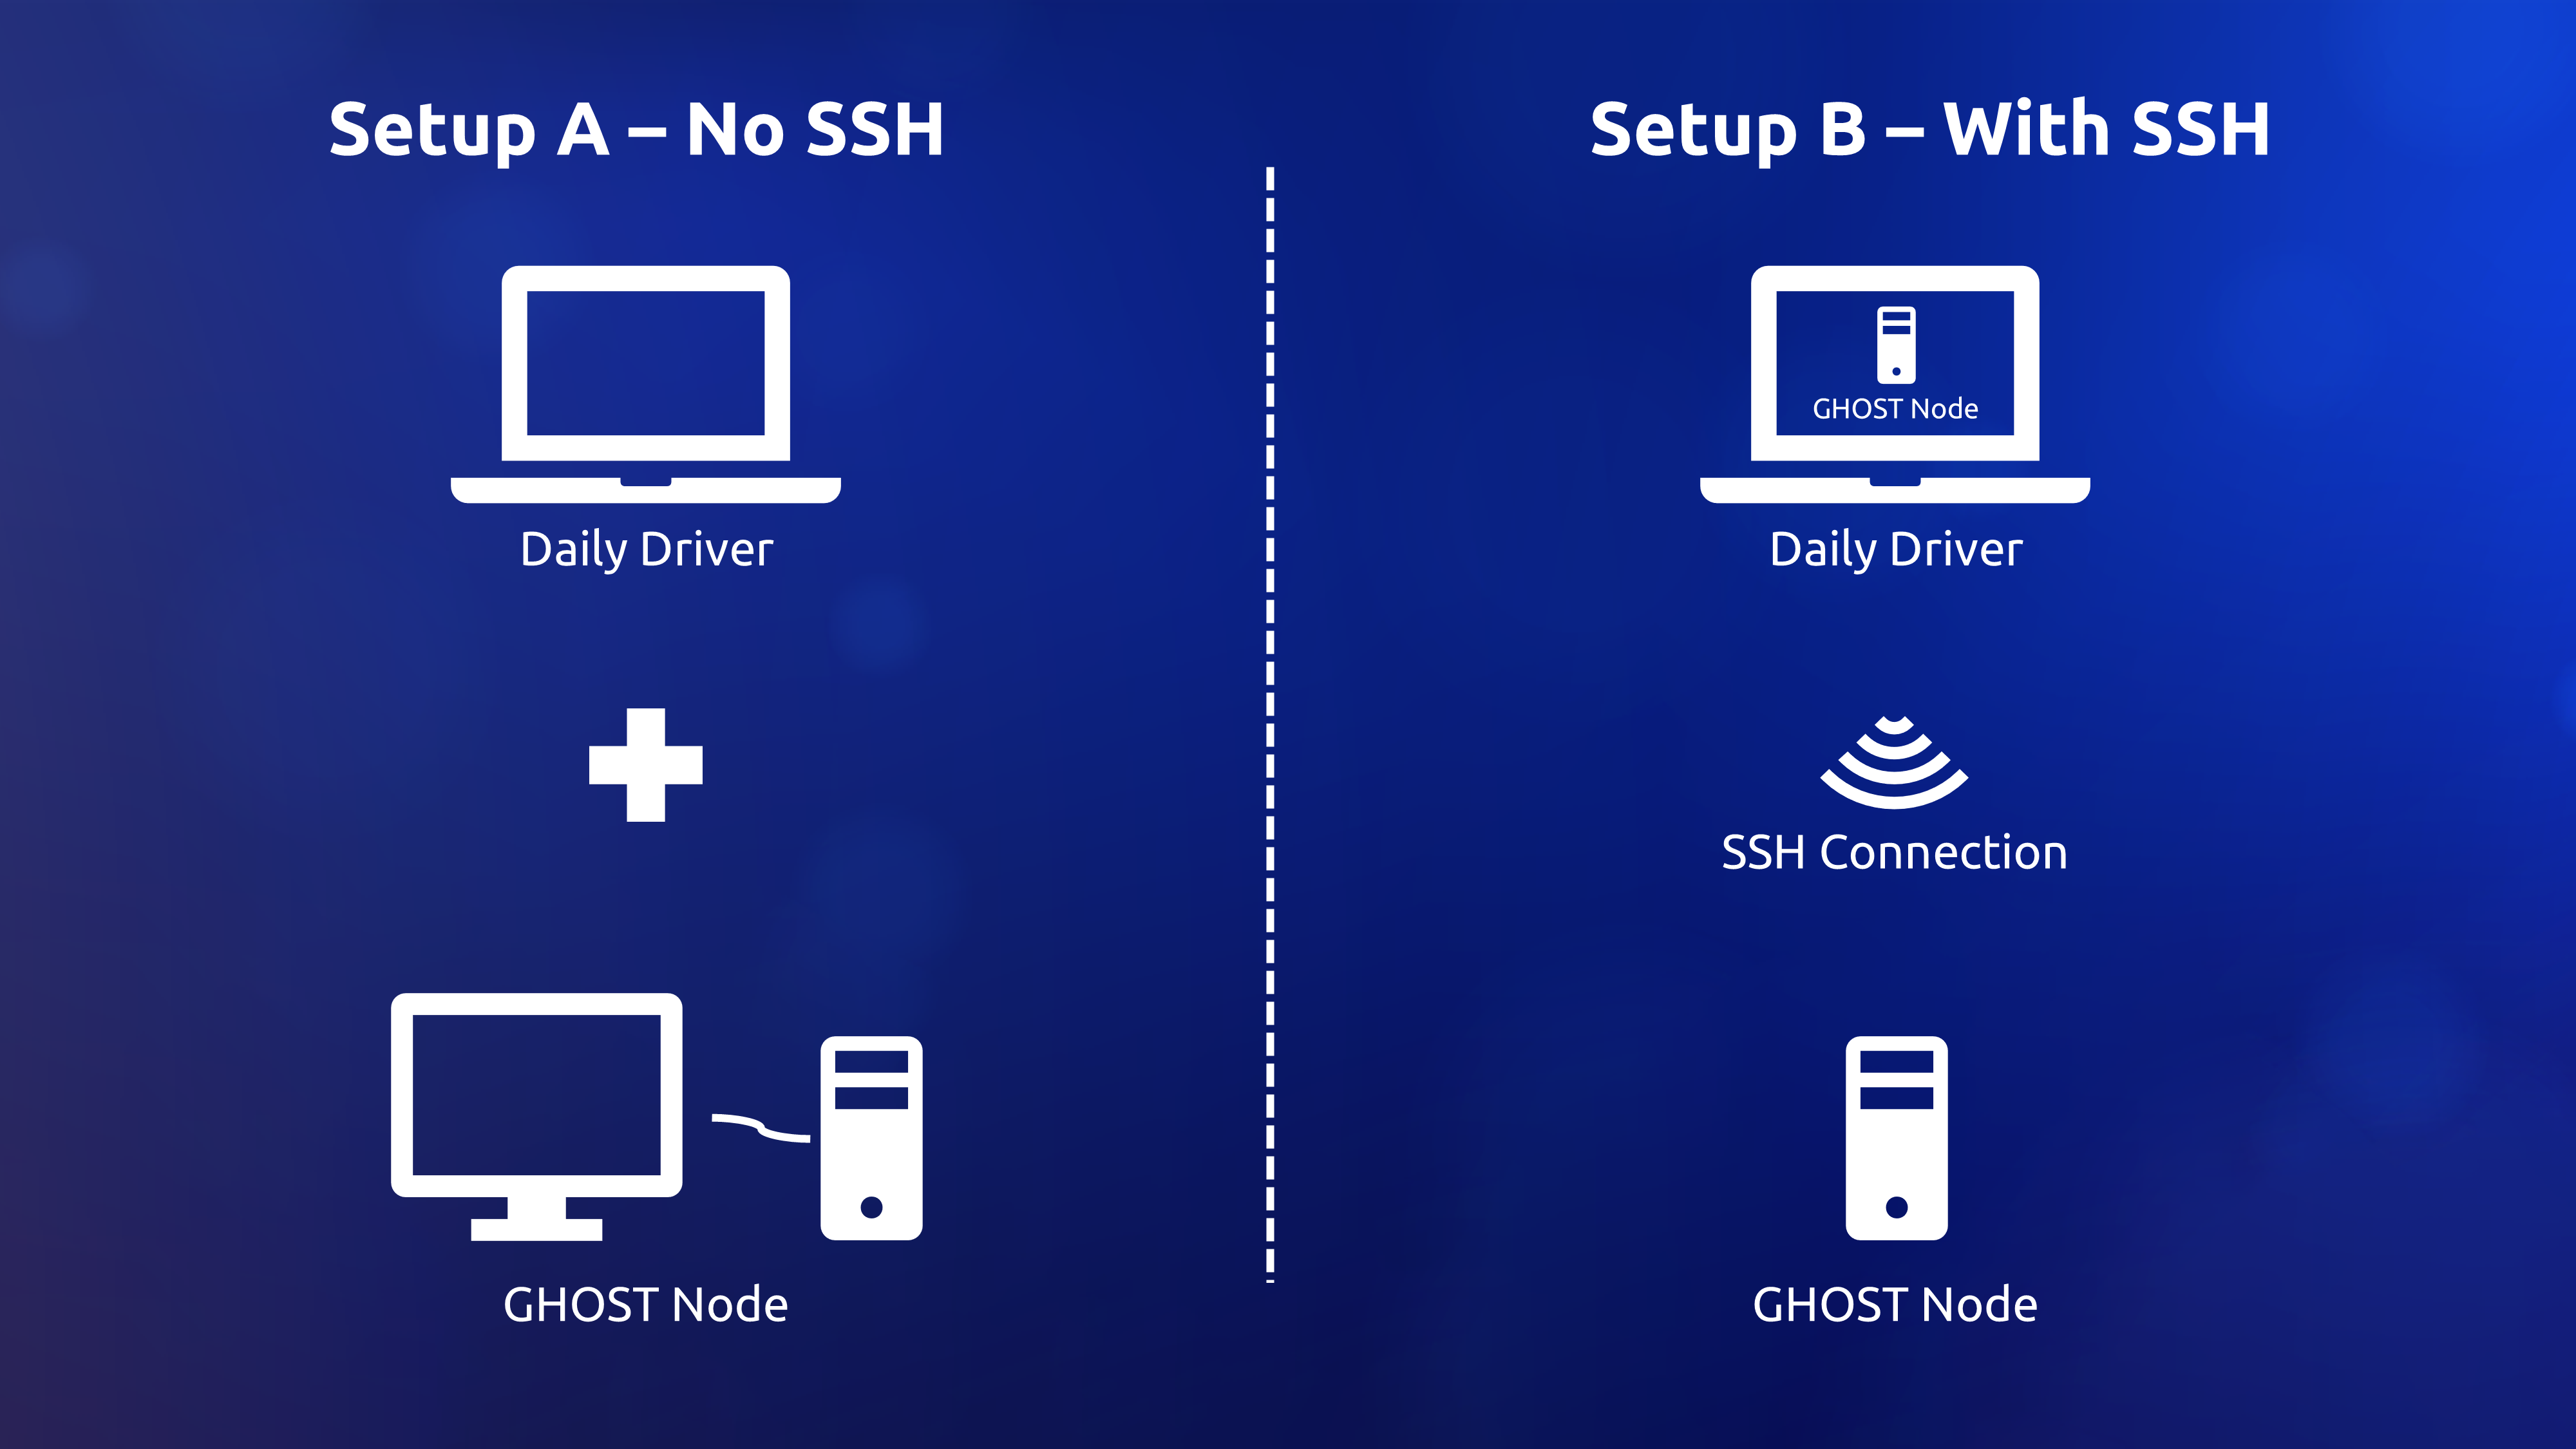
Once you have installed the proper Operating System on you machine we recommend that you enable SSH. Most people have a Daily Driver machine. GHOST requires a separate machine. Adding an extra machine to your life could be cumbersome. Chances are you had to use an external monitor to install Ubuntu on GHOST Node, the same screen regularly used by the Daily Driver machine. SSH enables you to manage your GHOST Nodes remotely from the comfort of your Daily Driver.
Open up the Terminal Application on you GHOST Node follow the commands.
Update Your System: Before installing any new software, it’s a good practice to update your system’s package list and upgrade the existing packages to their latest versions.
sudo apt updatesudo apt upgradeInstall OpenSSH Server: With your system updated, the next step is to install the OpenSSH server package. This package contains the necessary software to run an SSH server.
sudo apt install openssh-serverEnable SSH Service to Start on Boot: To ensure that the SSH service automatically starts after a reboot, you need to enable and start it using systemctl.
sudo systemctl enable sshsudo systemctl start sshTo check the status of the SSH service, run the following command:
sudo systemctl status sshYou should be seeing something like this:
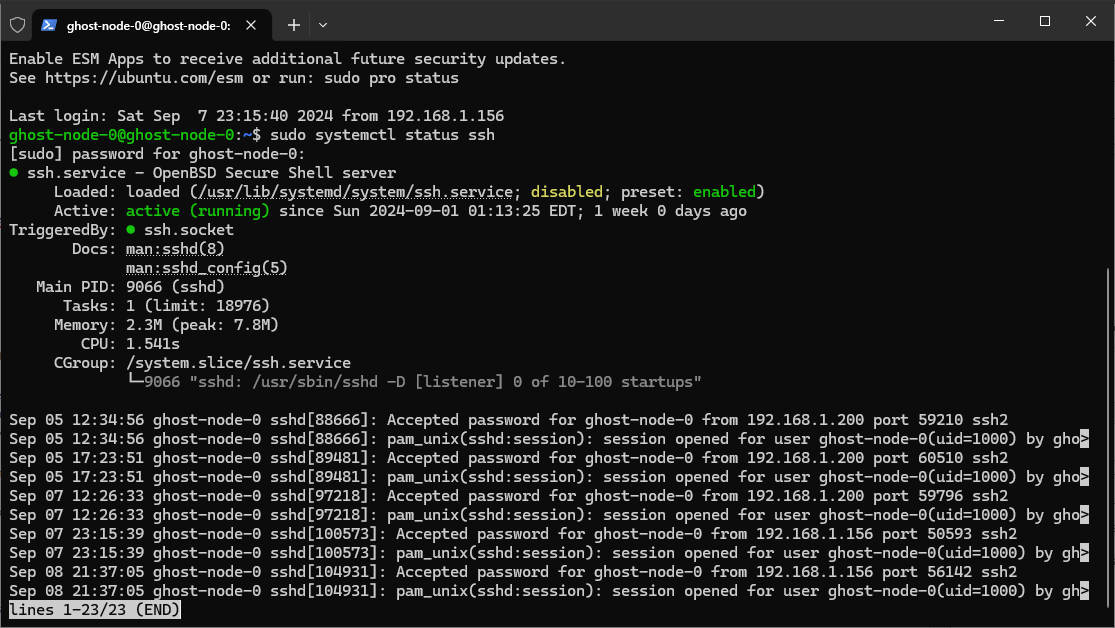
For SSH to become active, you may need to restart your device or run the following command in the terminal:
rebootConfigure Firewall: If you are using the UFW firewall, it’s necessary to configure it to allow SSH connections. This step is crucial for remote access, especially if you’re operating in a protected network environment.
sudo apt install ufwsudo ufw allow sshsudo ufw enablesudo ufw numberedConnect to Your Ubuntu Machine via SSH: With SSH enabled and the firewall configured, you can now connect to your Ubuntu machine from another computer using SSH. You have to know your username and your local network ip
ssh [username]@[your_server_ip_OR_hostname]Example – If the username of you node is casperLover and the IP of you node is 696.96.9.69 then the command should be:
ssh [email protected]
If your Daily Driver and GHOST Node are on the same network your can use localhost:
ssh [username]@localhostExample – If your username is casperLover then the command should be:
ssh casperLover@localhost
CONGRATULATIONS!!! You can now control your GHOST Node remotely from you daily driver.
4. Install GHOST TestNet

Allow Ports
Allow port 30333 on GHOST Node:
sudo ufw allow 30333To ensure that the ports are allowed, run the following command:
sudo ufw numberedInstall Substrate Libraries
Click here for a detailed Rust guide if you want to dive deep into the documentation. Otherwise let’s proceed.
Install Dependencies
Check the documentation for your operating system for information about the packages that are installed and how to download and install any additional packages you might need. For example, if you use Ubuntu, you can use the Ubuntu Advanced Packaging Tool (apt) to install the build-essential package:
sudo apt install build-essentialAt a minimum, you need the following packages before you install Rust:
sudo apt install clang curl git makeRust Install
sudo apt install --assume-yes git clang curl libssl-dev protobuf-compilersudo apt install --assume-yes git clang curl libssl-dev llvm libudev-dev make protobuf-compilerDownload the rustup installation program and use it to install Rust by running the following command:
curl --proto '=https' --tlsv1.2 -sSf https://sh.rustup.rs | shUpdate your current shell to include Cargo by running the following command:
source $HOME/.cargo/envVerify your installation by running the following command:
rustc --versionConfigure the Rust toolchain to default to the latest stable version by running the following commands:
rustup default stablerustup updateAdd the nightly release and the nightly WebAssembly (wasm) targets to your development environment by running the following commands:
rustup update nightlyrustup target add wasm32-unknown-unknown --toolchain nightlyrustup target add wasm32-unknown-unknown --toolchain stable-x86_64-unknown-linux-gnuIf you are trying to install WebAssembly (wasm) on an ARM based processor like the ones in Raspberry Pi try this instead:
rustup target add wasm32-unknown-unknown --toolchain stable-aarch64-unknown-linux-gnuIF error try
rustup target add wasm32-unknown-unknown --toolchain defaultVerify the configuration of your development environment by running the following command:
rustup showrustup +nightly showThe command displays output similar to the following:
# rustup show

active toolchain
----------------

stable-x86_64-unknown-linux-gnu (default)
rustc 1.62.1 (e092d0b6b 2022-07-16)

# rustup +nightly show

active toolchain
----------------

nightly-x86_64-unknown-linux-gnu (overridden by +toolchain on the command line)
rustc 1.65.0-nightly (34a6cae28 2022-08-09)
rustup component add rust-src --toolchain stableIF error try
rustup component add rust-src --toolchain defaultInstall GHOST
Ubuntu should already come with preinstalled Git package. Check if Git is already installed:
git --versionMake a GHOST Directory:
mkdir -p ghost && cd ghostClone GHOST Git:
git clone https://git.ghostchain.io/ghostchain/ghost-node.gitGo to ghost-node directory:
cd ghost-nodeCompile the node template by running the following command:
./scripts/starter.sh --releaseThe build can take up to 20 minutes depending on the specifications of your machine.

Download spec.json file:
wget -c https://ghostchain.io/wp-content/uploads/2024/09/spec.json -o ~/spec.jsonCONGRATULATIONS!! You have installed GHOST Chain on your GHOST Node.
5. Next Steps

If you have completed previous 4 steps you can now proceed to the GHOST Chain Testing Connectivity Guide.
![You are currently viewing GHOST Chain Startup Guide [~ 4HRS]](https://blog.ghostchain.io/wp-content/uploads/2024/09/GHOST-Chain-Startup-Featured-Image.png)


